ข้อที่ 2 การใช้งาน EC2 Instance พร้อมกำหนด User Data เพื่อติดตั้ง Apache Web Server และแสดงผลหน้าเว็บด้วยข้อความ HTML ผ่าน Web Browser
🧠 เป้าหมาย
-
สร้าง EC2 instance ประเภท
t2.microและใช้ User Data ติดตั้ง Apache (httpd) -
สร้างหน้าเว็บ
index.htmlอัตโนมัติที่แสดงข้อความ:<center><h1>This is xxxx instance with the code yyyy that runs the Apache Webserver!</h1></center> -
เปิด Security Group ให้สามารถเข้าถึง HTTP (port 80) ได้จากทุกที่
-
ทดสอบว่าเปิดหน้าเว็บผ่าน Browser แล้วเห็นข้อความ
-
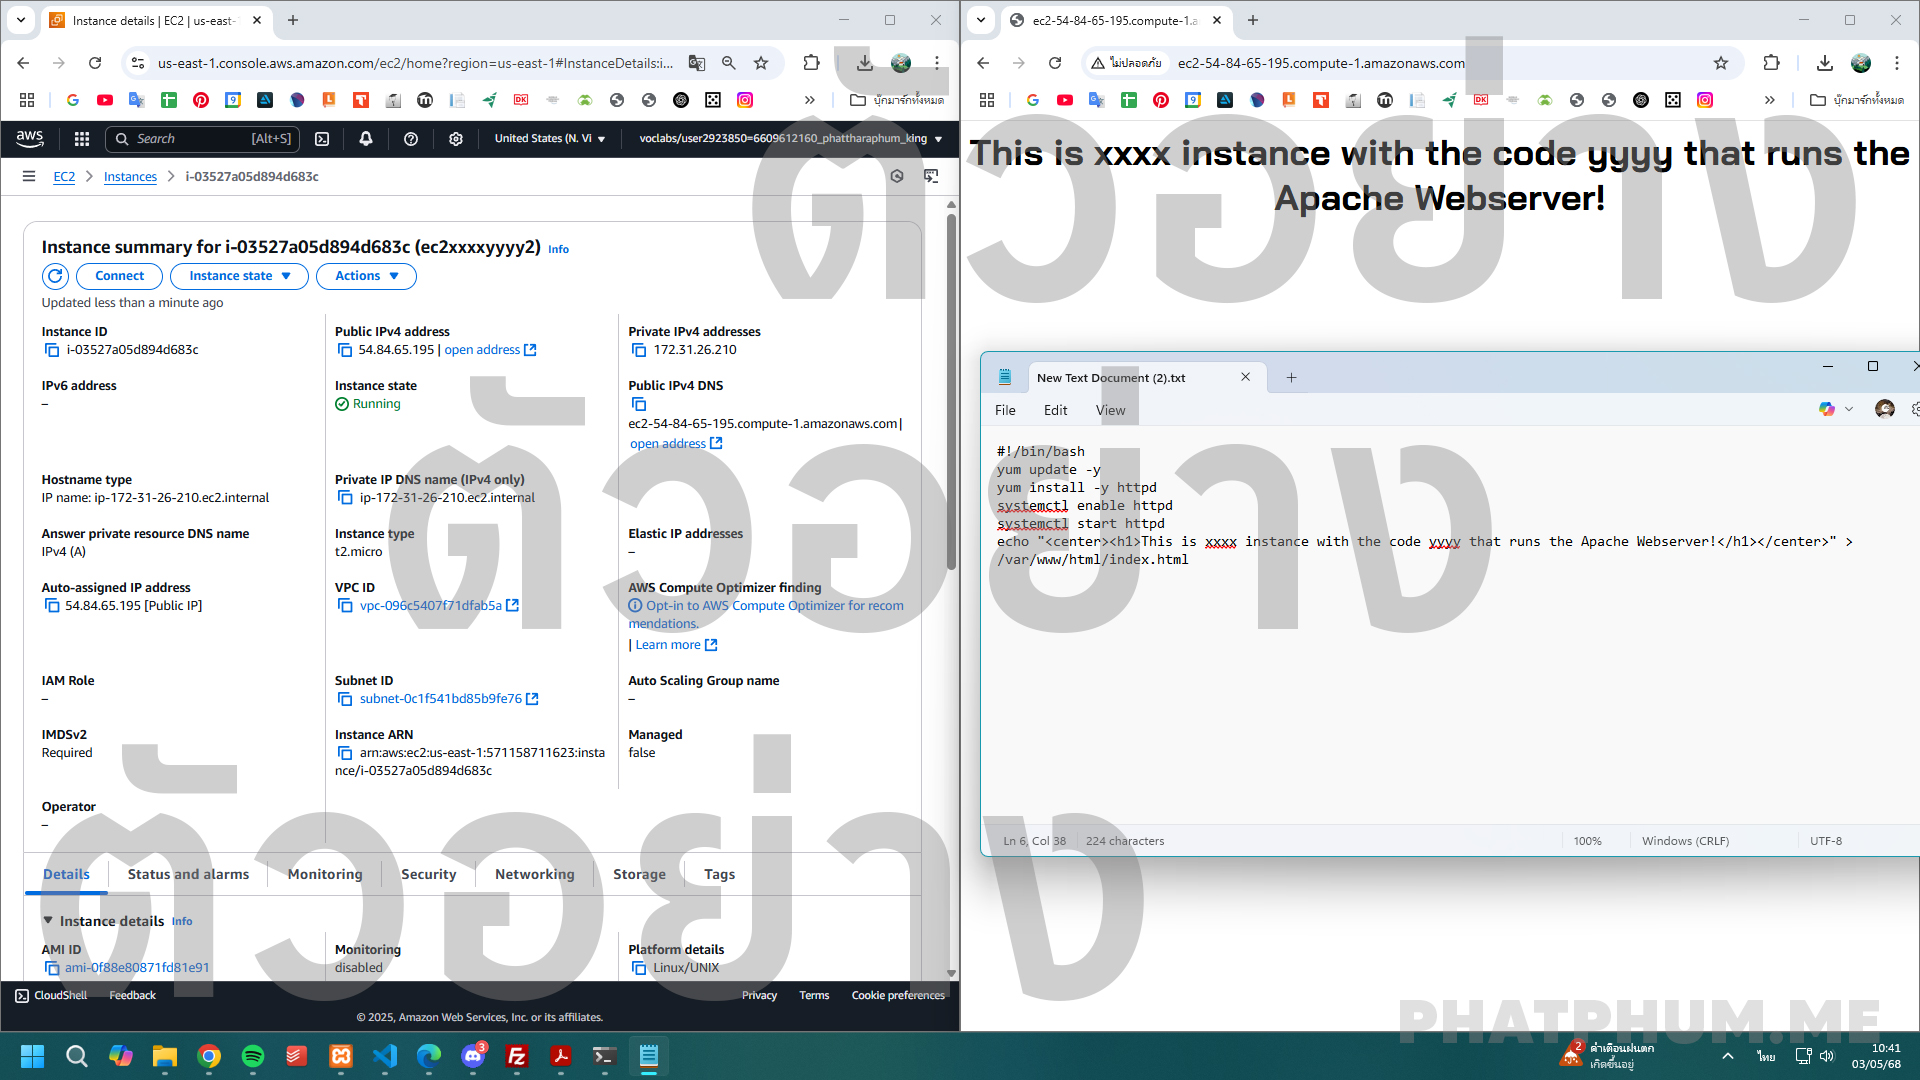
ถ่าย ภาพเดียว แสดง Instance Summary, user data script, และหน้าเว็บใน Browser
🧰 บริการที่เกี่ยวข้อง
- EC2: ใช้เปิดเครื่อง server
- User Data: ใช้รันคำสั่ง shell script ตอน boot ครั้งแรก
- Security Group: ใช้เปิด Port 80 (HTTP)
- Amazon Linux 2023: ระบบปฏิบัติการพื้นฐาน
🛠️ ขั้นตอนการทำ
1. เตรียม Script User Data
แก้ xxxx กับ yyyy ตามโจทย์:
#!/bin/bash
yum update -y
yum install -y httpd
systemctl enable httpd
systemctl start httpd
echo "<center><h1>This is xxxx instance with the code yyyy that runs the Apache Webserver!</h1></center>" > /var/www/html/index.html
2. เปิดใช้งาน EC2 Instance
-
ไปที่ EC2 Dashboard > Launch Instance
-
กำหนดค่า:
- Name:
ec2xxxxyyyy - AMI:
Amazon Linux 2023 AMI - Instance Type:
t2.micro - Key Pair: เลือก key เดิมหรือสร้างใหม่
- Name:
-
ในหัวข้อ Advanced Details > User data:
- วาง script ด้านบน (ต้องเริ่มด้วย
#!/bin/bash)
- วาง script ด้านบน (ต้องเริ่มด้วย
-
ใน Network settings:
- ติ๊ก Allow HTTPS traffic from the internet`
- ติ๊ก Allow HTTP traffic from the internet
-
คลิก Launch Instance
3. ตรวจสอบผลลัพธ์
- รอให้ instance เป็น
Runningและ2/2 passed -
ดูค่า Public IPv4 DNS เช่น:
ec2-13-250-123-123.ap-southeast-1.compute.amazonaws.com
4. เปิดเว็บใน Browser
-
เปิด Chrome แล้วเข้า:
http://<Public-DNS> -
ตัวอย่าง:
http://ec2-13-250-123-123.ap-southeast-1.compute.amazonaws.com -
ต้องเห็นข้อความใน
<h1>ที่คุณระบุไว้ -
ข้อสังเกต: ต้องเป็น HTTP ไม่ใช่ HTTPS
-
ถ้าไม่เห็น ให้ตรวจสอบ Security Group ว่าเปิด Port 80 (HTTP) หรือยัง
📸 สิ่งที่ต้องแคปส่ง
รวมทุกอย่างไว้ใน รูปเดียว ให้เห็น:
- หน้า EC2 Instance Summary (ชื่อ, ประเภท, Public IPv4 DNS)
- Script User Data (สคริปต์ที่ใช้จริง)
- หน้าเว็บใน Chrome ที่แสดงข้อความ พร้อม URL ชัดเจนในช่อง address bar